Pages

Friday 22 December 2017

Christmas Dreamcatcher - Acchiappasogni Natalizio - L'Avvento Creativo

Oggi è il nostro turno per l'Avvento Creativo e vi proponiamo un tutorial per creare una decorazione speciale per Natale: l'Acchiappasogni Natalizio.


L'Acchiappasogni o Dreamcatcher si trasforma per Natale per diventare una decorazione da appendere all'ingresso di casa oppure all'interno, anche come porta regalini. Infatti semplicemente cambiando il numero appeso si può utilizzare l'acchiappasogni natalizio come calendario dell'Avvento, inserendo piccoli regali all'interno della tasca.


Vi mostriamo i semplici passi per creare questa decorazione. Innanzitutto l'occorrente:

- Telaio da ricamo (diametro 21,5 cm )
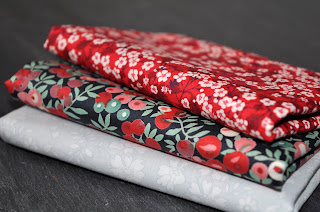
- Due stoffe (stoffa per lo sfondo 25x25cm, stoffa per la tasca 25x20cm)
- Penne per creare perle
- Penna cancellabile oppure matita
- Cerchio di cartoncino della misura del cerchio interno del telaio
- Nastri, pizzi, ritagli, mollette e piccole decorazioni...

Naturalmente si può utilizzare un telaio da ricamo più grande oppure più piccolo e in questo caso sarà necessario calcolare la misura delle stoffe, considerando sempre almeno 1,5 cm di margine tutto intorno al telaio.


Per iniziare scegliere una stoffa per il fondo e controllare che sbordi di almeno 1,5 cm rispetto al cerchio interno del telaio da ricamo. Noi abbiamo scelto di creare un patchwork di piccoli ritagli ma si può semplicemente scegliere anche una stoffa a tema natalizio.


Prendendo la seconda stoffa (meglio se di un colore che si stacchi dal colore della stoffa utilizzata per lo sfondo), piegarla a metà in modo da creare la tasca.


Sovrapponendo la tasca alla stoffa scelta come sfondo, si sceglie la profondità della tasca. Utilizzando il cerchio del telaio, si segna con la penna cancellabile oppure una matita il bordo del cerchio e si utilizza questo segno per centrare la scritta che si sceglie di realizzare sulla tasca. Tracciare anche la scritta con la penna cancellabile prima di realizzarla.


La scritta può essere realizzata adesso utilizzando una penna per creare perle oppure una penna per creare decorazioni a rilievo su stoffe. Si può anche scegliere di realizzare la scritta con il ricamo, visto che si ha già il telaio da ricamo a disposizione!


Adesso arriva il momento più divertente: decorare l'anello esterno del telaio con tutti i nastri ed i ritagli scelti! Ricordarsi di fissare anche un filo o nastro con una molletta in fondo da utilizzare per appendere bigliettini oppure la data del calendario dell'Avvento.


Una volta completata la scritta e le decorazioni sull'anello esterno del dreamcatcher, posizionare entrambe le stoffe sopra il cerchio interno del telaio da ricamo e poi fermarle con il cerchio esterno del telaio. Sul retro, inserire il cerchio di cartone ritagliato in precedenza usando il cerchio interno del telaio come riferimento. Incollare la stoffa in eccesso sul cartoncino sul retro. Si può coprire il retro poi con un altro cerchio di cartoncino oppure di feltro per nascondere il bordo della stoffa. 

Ora basta aggiungere la data del giorno...


e qualche regalino speciale!


Speriamo vi sia piaciuta la nostra idea per L'Avvento Creativo e vi invitiamo a visitare tutte le amiche che stanno partecipando a questo bellissimo evento. Potete trovare l'elenco completo nel nostro post qui.


Vorremmo ringraziare di cuore Ivy de Le Creazioni di Ivy, per aver organizzato L'Avvento Creativo che ci ha permesso di conoscere un bellissimo gruppo di creative.

Augurissimi di Buon Natale!

Ella and Nesta


Vieni a trovarci anche su Instagram:


Friday 17 November 2017

Creating Christmas - L'Avvento Creativo

Siamo tornate, dopo quasi due anni di assenza dal blog, per un evento davvero speciale, o meglio un Avvento davvero speciale! Infatti, insieme alle amiche dell'Avvento Creativo prepareremo un Natale veramente unico, con tante idee creative. Un grandissimo grazie a Ivy de Le Creazioni di Ivy, che con la sua energia ha dato vita a questa bellissima iniziativa:


Dal 1° Dicembre al 24 Dicembre, troverete ogni giorno un nuovo tutorial dedicato al Natale:


E c'e' una sorpresa perché già oggi potete visitare la pagina Facebook di Adriana - Coccole tra le nuvole di mamma Dada - e scoprire come creare uno stupendo December Daily dove raccogliere i ricordi del vostro Avvento Creativo. Adriana propone un tutorial in due parti per creare il tuo album in tempo per il 1° Dicembre.

Buon divertimento e buone creazioni!
Ella and Nesta


Vieni a trovarci anche su Instagram:


Monday 14 December 2015

Christmas Gift Tags Tutorial - The Creative Factory - Handmade Xmas Linky Party

E' iniziata la corsa verso Natale ma c'è ancora tempo per l'handmade! Allora non perdetevi il linky party di The Creative Factory, aperto a tutti! Tantissime belle idee per farsi ispirare e la possibilità di aggiungere i propri progetti fino al 31 dicembre 2015.


Ad ospitare il linky Handmade Xmas Party sono le amiche de The Creative Factory ed i progetti sono visibili su tutti i nostri blog:

Noi siamo state ispirate dai bellissimi bigliettini a forma di etichetta visti su Pinterest e su Instagram. Le nostre etichette sono veloci da creare e si può facilmente aggiungere un messaggio oppure un nome, perfetti per impacchettare regali speciali. 


Come fare: per crearli basta un'etichetta da pacco, alcuni ritagli di stoffa natalizia e dei nastri. Sovrapponi ritagli di stoffa coordinati e di misura decrescente, aggiungi una piccola etichetta di carta con la scritta "Buon Natale", avendo cura di allineare tutto in alto. Usare la macchina da cucire con punto zigzag per fermare i vari strati. Aggiungi il nastro nel foro rinforzato dell'etichetta da pacco ed annodare. Ecco la vostra etichetta di Natale handmade!


#xmashandmadelinkyparty


Follow on Bloglovin


Saturday 28 November 2015

Come creare Decorazioni Natalizie con i triangoli - Tutorial per Natale in Festa #TopBloggerKreattive

Natale in Festa ed ecco che arrivano le TopBloggerKreattive! Grazie Rosa per questa bellissima iniziativa che raccoglie tante idee originali e tutorial per delle creazioni natalizie speciali. Noi ci siamo siamo dedicate alle decorazioni per la casa e per i pacchetti regalo, usando triangoli di stoffa.


Ecco che cosa serve per creare la decorazione Alberello di Natale, da usare come decorazione per la porta di casa, per l'albero di Natale oppure per decorare un pacchetto regalo:

  • 4 pezzi di stoffa, ognuno circa 9cm x 11,5cm
  • 1 pezzo di stoffa da usare per il retro dell'alberello circa 20x20cm
  • Imbottitura
  • 1 pezzo di nastro lungo circa 8 cm
  • 1 bastoncino di cannella lungo circa 20cm
  • Decorazioni aggiuntive come campanelli, bottoni, nastri... a piacere.
I margini di cucitura che abbiamo usato sono da 1/4 di pollice (circa 0,65cm).


Inizia tagliando i pezzi di stoffa ad un'altezza di 8.5cm e poi, usando le linee da 60° sul tappetino per tagliare (oppure una squadretta), taglia i lati di ciascun pezzo di stoffa per formare un triangolo. 


Disponi i quattro pezzi di stoffa nell'ordine desiderato. Noi abbiamo tagliato le punte per rendere più facile cucire insieme i triangoli. Adesso cucire i tre triangoli inferiori insieme, come nella foto. Poi cucire il triangolo superiore, centrandolo sopra i tre triangoli già cuciti.


Stirare e poi posizionare i triangoli cuciti a faccia in giù sopra la stoffa per il retro. Piega il nastro a metà e posiziona in cima, tra le due stoffe, come nella foto. Usare degli spilli per tenere il nastro e le due stoffe in posizione. Adesso cucire tutto intorno, lasciando uno spazio aperto in fondo per rovesciare il tutto. Taglia via la stoffa in eccesso.


Rovescia le stoffe e, usando una matita oppure un attrezzo a punta, spingere delicatamente in fuori le punte. Iniziare a riempire con imbottitura ed infilare, centrandolo, il bastoncino di cannella. Aggiungere ancora imbottitura e poi chiudere l'apertura cucendo a mano.


La decorazione Alberello di Natale è pronta! 


In cerca di altre idee per Natale? Ecco la lista delle TopBloggerKreattive da visitare per NATALE IN FESTA:


Follow on Bloglovin


Thursday 29 October 2015

Fabric Gift Tag Tutorial - Japanese Furin Wind Chime for Ho, Ho, Ho and on We Sew Linky Party + Giveaway

Have you already started thinking about wrapping up Christmas presents? We bet you have! It's an important part of the present, isn't it? We have an easy tutorial today for making Fabric Furin Wind Chime Gift Tags. The Japanese Furin is a beautiful and poetic wind chime or wind bell. The Furin is traditionally hung from the eaves of a house or in front of a window. The sound of these wind chimes is a symbol of mental relaxation and said also to bring good luck. 


These Fabric Furin Wind Chime Gift Tags, once the present has been unwrapped, can really be used as a wind chime and make a pretty decoration. 


Here is what you will need to make a Fabric Furin Wind Chime Gift Tag:
  • Small pieces of fabric to make the Furin bell shape: four pieces about 3"x2 1/2" (7,6x6,4cm), two for the lining of the bell and two for the outside.
  • Metal bell
  • Embroidery thread or thin cord
  • Strip of thick paper 5"x1" (about 12,7x2,6cm)
  • Eyelet and pliers for inserting eyelets

Start by drawing the bell template or print our .pdf template hereOur bell shape is about 2 1/2" high and 3" wide (this includes a 1/8" seam allowance).

 Fabric Furin Gift Tag

Use this template to trace and cut out four pieces of fabric, two for the lining of the bell and two for the outside. 


Place one piece of the fabric for the outside of the bell on one piece of lining fabric, right sides together. Sew along the straight line at the bottom. Repeat for the other two pieces of fabric.


Open the seam pressing flat in the center. Now place the fabric pieces you have sewn right sides together and sew right around the edge, leaving an opening (on the lining fabric side) for turning right side out. 


Once turned right side out, close the opening and then push the lining inside the bell shape.


Insert the eyelet (after making a little hole) with pliers onto the paper tag and tie the tag using embroidery thread or a thin cord. Tie a knot on the paper tag and a knot to fix the metal bell into place. Pass the other end of the thread through the inside of the fabric bell and out through the center. Tie a loop above the fabric bell to hang the gift tag. To keep everything in place, turn the fabric bell inside out and tie a knot close to the top of the inside of the fabric bell.

Write a name and message on the paper tag and add a stamp. Fix the gift tag to the present with a piece of washi tape to finish off. Here is your Fabric Furin Wind Chime Gift Tag, a present in itself, to keep and hang up as a pretty decoration. Christmas themed fabric will make for a keepsake Christmas decoration!


If you'd like to see our first tutorial for the Ho, Ho, Ho and on We Sew Linky Party, then have a look here for: Fabric Covered Drawing Pins


 Fabric Covered Drawing Pins

You are still in time to enter the Ho, Ho, Ho and On We Sew Linky Party here for a chance of winning this incredibly beautiful Liberty fabric generously offered by Duck Egg Threads.

The winner is Vicki with this crowd of Snowmen!

  Duck Egg Threads


Follow on Bloglovin


Monday 26 October 2015

Fabric Covered Drawing Pins Tutorial - Ho, Ho, Ho and on We Sew Linky Party + Giveaway

Have you already joined the Ho, Ho, Ho and on We Sew Linky Party? If you're sewing something for Christmas then enter this fun linky party for a chance to win some beautiful Liberty fabric offered by Duck Egg Threads.


The first of our tutorials for the Ho, Ho, Ho and on We Sew Linky Party is a very quick make and a useful present: Fabric Covered Drawing Pins. Choose a special fabric and gift these drawing pins in a pretty box or small jar. A box of them is a good stocking filler too!


Here is what you will need:
  • Self cover buttons, sized 15mm (you can use a different size if you like)
  • Small pieces of fabric to cover the button. We used Bonnie and Camille's Miss Kate mini charms to cover our buttons
  • Metal drawing pins (not covered with plastic)
  • Hot glue gun

Start by covering your buttons. As we can’t find, at the moment, flat backed self cover buttons here in Italy, before covering the buttons we took out the metal hook from the back, using a pair of pliers. To cover the button, draw a circle on the fabric about 1/2” inch wider all around the button, cut out the fabric and then fix it over the self cover button. Close the back of the button following the product instructions.
You can really enjoy yourself covering the buttons with fussy cuts from scraps of fabric to create special themed drawing pins.

Using a hot glue gun, put a dab of hot glue on the head of the drawing pin and glue the pin to the back of the self cover button, centering it. 

Now you just need a pretty box or small jar to pop your new (and original!) Fabric Covered Drawing Pins in.


Don’t forget to enter the Ho, Ho, Ho and On WeSew Linky Party here to join in the fun and for a chance of winning this incredibly beautiful Liberty fabric generously offered by Duck Egg Threads.

The winner is Vicki with this crowd of Snowmen!

  Duck Egg Threads


Follow on Bloglovin


Sunday 18 October 2015

Liberty Fabric Giveaway for Ho, Ho, Ho and on We Sew Linky Party

Christmas! Yes, we've said it out load. We know we've all started thinking about Christmas even though we're trying not to mention it yet! Many have been following Fiona of Celtic Thistle Stitches and Paula of Mud, Pies and Pins with their Ho, Ho, Ho and on We Sew Linky Party during the year, getting ahead of their Christmas and Holiday crafting. If you have already got to work or are planning to start in the next few days, then don't miss this month's Linky Party, with a very special giveaway prize. One lucky crafter from this month's links will win three F8th's of beautiful Liberty fabric from Duck Egg Threads:

 Duck Egg Threads

duck egg threads

Sarah, who has generously offered this lovely prize, has a wonderful selection of Liberty fabrics in her online shop. In Sarah's shop you can also subscribe to the We Love Liberty Monthly Club, delivering a special Liberty bundle each month!

WLLMC_pg-head


Please check out all our generous sponsors too for your Christmas and Holiday crafting needs:


Crafty Trimmings
http://www.patchworkelephant.com/

Logo Sew Hot

Plush Addict Logo


Quilting Fabric at the Fat Quarter Shop

We would like to thank Fiona and Paula for inviting us to co-host this month's Linky Party with Sandra of Sandra Sews. Until the end of the month we will be posting tutorials for Christmas and Holiday ideas and cheering on your holiday crafting. So don't miss out, you still have plenty of time for a Handmade Christmas!


Follow on Bloglovin


And now for the Ho, Ho, Ho and on We Sew Linky Party, open until the last day of October: